Creating a professional email signature in Gmail is one of the easiest ways to make your emails look polished and credible. Whether you’re a student, freelancer, or working professional, a well-designed signature acts like your digital business card—sharing your identity and contact details instantly.
Here’s a complete, easy-to-follow guide to create, customize, and manage your Gmail signature.
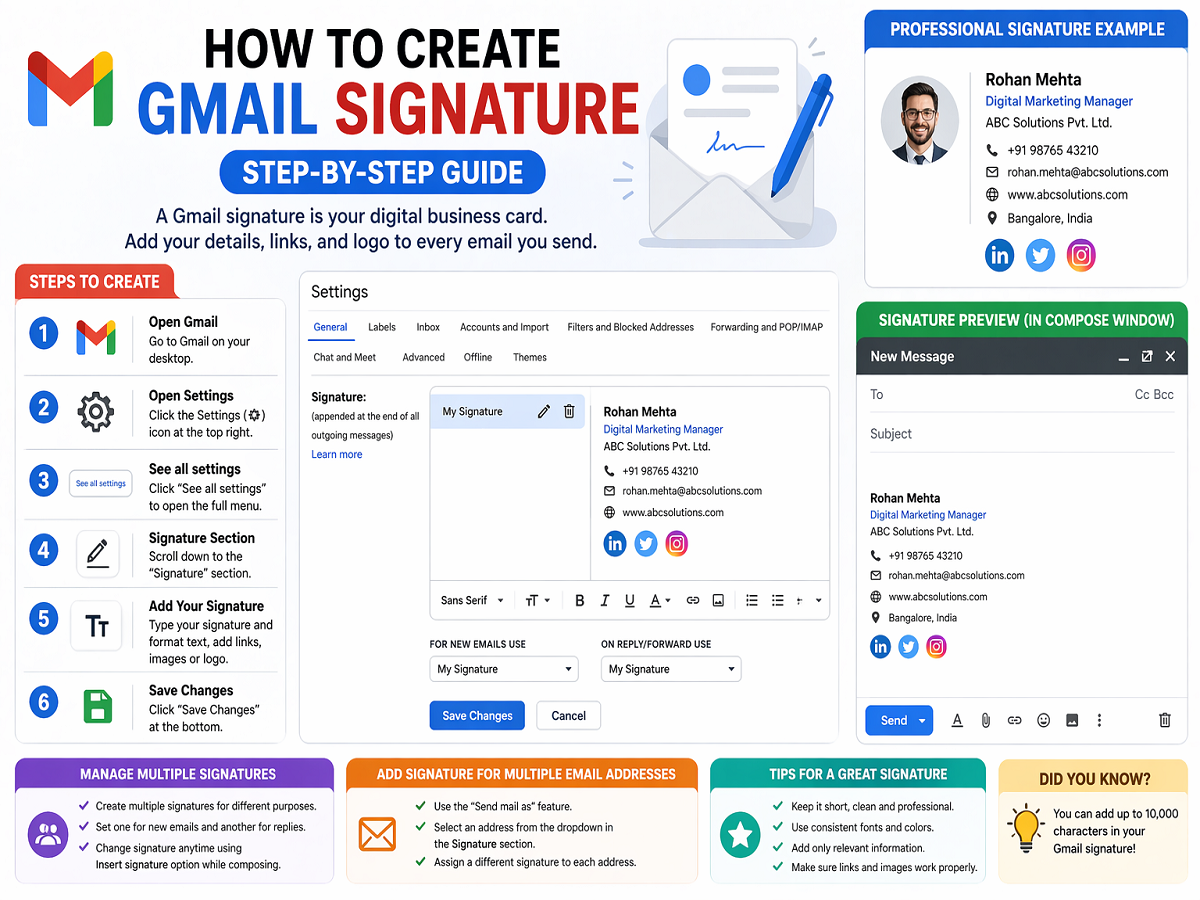
Why a Gmail Signature Is Important
A signature is more than just your name at the end of an email. It helps you:
- Build professionalism and trust
- Share contact details quickly
- Promote your brand or business
- Keep communication consistent
You can include your name, job title, company, phone number, website, and even social media links.
Step-by-Step: How to Create a Gmail Signature
Follow these simple steps:
- Open Gmail on your browser
- Click the Settings (⚙️ icon) in the top-right corner
- Select “See all settings”
- Scroll down to the Signature section
- Click “Create new” and name your signature
- Enter your signature text in the box
- Customize it using formatting options (font, size, color, links, images)
- Scroll down and click “Save Changes”
That’s it—your signature will now appear in your emails automatically.
What You Can Add to Your Signature
Make your signature more effective by including:
- Full Name
- Job Title / Role
- Company Name
- Phone Number
- Website or portfolio link
- Social media icons
- Company logo or personal branding
Keep it clean and avoid adding too much clutter.
How to Use Multiple Signatures
Gmail allows you to create and manage multiple signatures for different purposes.
You can:
- Set one signature for new emails
- Use another for replies or forwards
- Switch signatures manually while composing
To change while writing an email:
- Click Insert Signature at the bottom of the compose window
- Select your preferred signature
Add Signature for Multiple Email Addresses
If you use the “Send mail as” feature in Gmail:
- You can assign different signatures to different email addresses
- Select the email from the dropdown in Signature settings
- Create a unique signature for each account
If you don’t see the option:
- Go to Accounts and Import settings
- Add your email under “Send mail as”
Pro Tips for a Professional Look
- Keep it short and readable
- Use consistent fonts and colors
- Avoid too many images or heavy designs
- Test how it looks on mobile devices
- Make sure links are clickable and working
Final Takeaway
A well-crafted Gmail signature can instantly elevate your communication. It reflects professionalism, builds trust, and ensures your contact details are always accessible.
Spend a few minutes setting it up properly—and every email you send will leave a stronger impression.